Getting Started
Installation
Currently, running Divolte Collector is only supported on Unix-like systems, such as Linux or Max OS X. While it should also work in Cygwin, we haven’t tested this yet.
Divolte Collector requires Java 8. It is recommended that you use a recent version of Oracle JDK 8. You can download a recent version from Oracle’s website at this address: http://www.oracle.com/technetwork/java/javase/downloads/jdk8-downloads-2133151.html. Please verify that you have a correct Java version by running this command:
java -version
Which should output something like this:
java version "1.8.0_25"
Java(TM) SE Runtime Environment (build 1.8.0_25-b17)
Java HotSpot(TM) 64-Bit Server VM (build 25.25-b02, mixed mode)
Next step is to download, unpack and run Divolte Collector. You can find the recentmost version on our project homepage. Download the tarball release (.tar.gz) from there and unpack it:
# Extract archive
tar -xzf divolte-collector-*.tar.gz

# Move into directory
cd divolte-collector-*

# Create empty config file
touch conf/divolte-collector.conf

# Run
bin/divolte-collector
On startup, you should see output similar to this:
2014-12-17 09:16:30.328+01 [main] INFO  [IncomingRequestProcessingPool]: Using built in default Avro schema.
2014-12-17 09:16:30.456+01 [main] INFO  [IncomingRequestProcessingPool]: Using built in default Avro schema.
2014-12-17 09:16:30.869+01 [main] INFO  [IncomingRequestProcessor]: Using built in default schema mapping.
2014-12-17 09:16:30.879+01 [main] INFO  [UserAgentParserAndCache]: Using non-updating (resource module based) user agent parser.
2014-12-17 09:16:31.143+01 [main] INFO  [UserAgentParserAndCache]: User agent parser data version: 20141003-01
2014-12-17 09:16:31.169+01 [main] INFO  [IncomingRequestProcessor]: Using built in default schema mapping.
2014-12-17 09:16:31.169+01 [main] INFO  [UserAgentParserAndCache]: Using non-updating (resource module based) user agent parser.
2014-12-17 09:16:31.169+01 [main] INFO  [UserAgentParserAndCache]: User agent parser data version: 20141003-01
2014-12-17 09:16:33.366+01 [main] INFO  [Slf4jErrorManager]: 0 error(s), 0 warning(s), 85.72274881516587% typed
2014-12-17 09:16:33.366+01 [main] INFO  [JavaScriptResource]: Pre-compiled JavaScript source: divolte.js
2014-12-17 09:16:33.392+01 [main] INFO  [GzippableHttpBody]: Compressed resource: 7197 -> 3576
2014-12-17 09:16:33.429+01 [main] INFO  [Server]: Starting server on 0.0.0.0:8290
2014-12-17 09:16:33.439+01 [main] INFO  [xnio]: XNIO version 3.2.0.Final
2014-12-17 09:16:33.518+01 [main] INFO  [nio]: XNIO NIO Implementation Version 3.2.0.Final
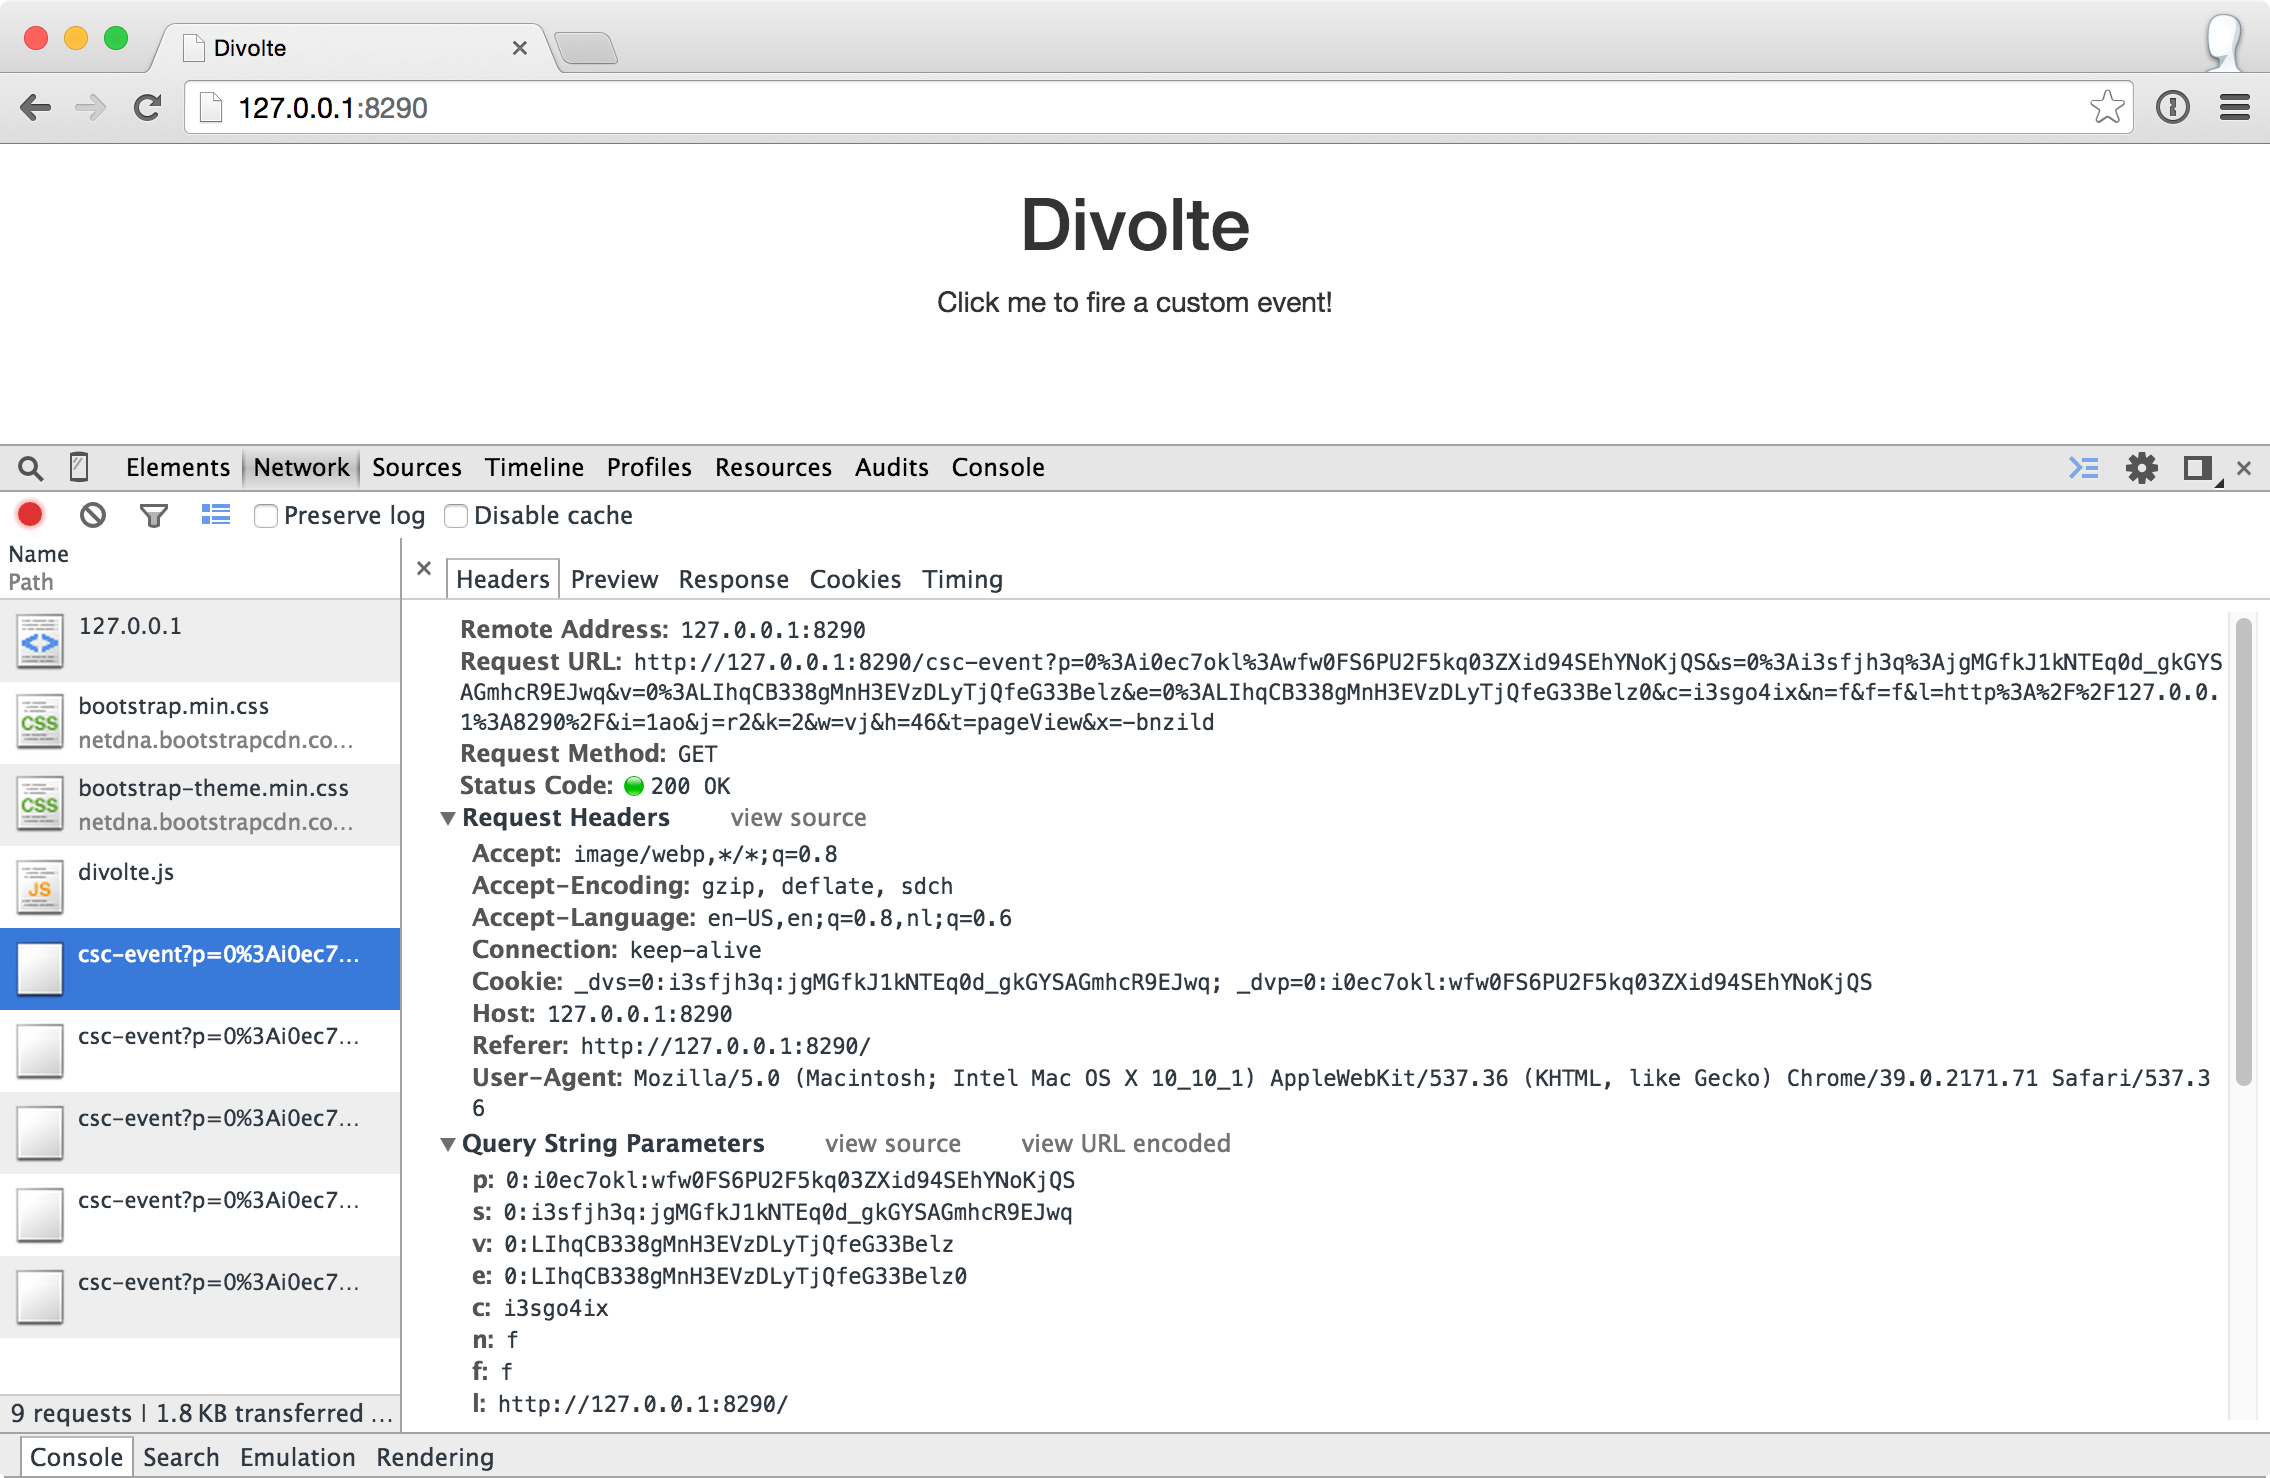
Now, take your web browser to http://127.0.0.1:8290/ and check that you see a page there. This webpage has the Divolte Collector JavaScript tag inserted into it, so loading the page will register a pageview event with the server. Also, you can click the banner a one or more times to generate additional events or reload the page a few times. If you enable the developer tools in your browser, you can see the additional HTTP request being made by the JavaScript tag:
Looking at the data
Now, go back to the console where Divolte Collector is running and hit CTRL+C (or kill the process). You should see output similar to this:
^C2014-12-17 09:27:15.393+01 [Thread-8] INFO  [Server]: Stopping HTTP server.
2014-12-17 09:27:15.396+01 [Thread-8] INFO  [Server]: Stopping thread pools.
2014-12-17 09:27:17.399+01 [Thread-8] INFO  [Server]: Closing HDFS filesystem connection.
When Divolte Collector shuts down, it will flush and close all open files, so now we can have a look at the data that was generated. By default, with no configuration, Divolte Collector will write .avro files in /tmp on the local filesystem. For convenience, Divolte Collector packages a version of the avro-tools that come with Apache Avro, so you can look at the contents of these files as JSON records. Try the following:
find /tmp/*.avro -name '*divolte-tracking-*.avro' | sort | tail -n1 | xargs bin/avro-tools tojson --pretty
This finds a .avro file in your /tmp directory and passes it to the avro-tools tojson command. Depending on how many requests you made, it will display multiple records. The output for a single record should look like this:
{
  "detectedDuplicate" : false,
  "detectedCorruption" : false,
  "firstInSession" : false,
  "timestamp" : 1418804737090,
  "remoteHost" : "127.0.0.1",
  "referer" : null,
  "location" : {
    "string" : "http://127.0.0.1:8290/"
  },
  "viewportPixelWidth" : {
    "int" : 777
  },
  "viewportPixelHeight" : {
    "int" : 252
  },
  "screenPixelWidth" : {
    "int" : 1680
  },
  "screenPixelHeight" : {
    "int" : 974
  },
  "partyId" : {
    "string" : "0:i0ec7okl:wfw0FS6PU2F5kq03ZXid94SEhYNoKjQS"
  },
  "sessionId" : {
    "string" : "0:i3sfjh3q:jgMGfkJ1kNTEq0d_gkGYSAGmhcR9EJwq"
  },
  "pageViewId" : {
    "string" : "0:XKmxLm9hkxKiUVZBRKw1eT5pKAglq078"
  },
  "eventType" : "pageView",
  "userAgentString" : {
    "string" : "Mozilla/5.0 (Macintosh; Intel Mac OS X 10_10_1) AppleWebKit/537.36 (KHTML, like Gecko) Chrome/39.0.2171.71 Safari/537.36"
  },
  "userAgentName" : {
    "string" : "Chrome"
  },
  "userAgentFamily" : {
    "string" : "Chrome"
  },
  "userAgentVendor" : {
    "string" : "Google Inc."
  },
  "userAgentType" : {
    "string" : "Browser"
  },
  "userAgentVersion" : {
    "string" : "39.0.2171.71"
  },
  "userAgentDeviceCategory" : {
    "string" : "Personal computer"
  },
  "userAgentOsFamily" : {
    "string" : "OS X"
  },
  "userAgentOsVersion" : {
    "string" : "10.10.1"
  },
  "userAgentOsVendor" : {
    "string" : "Apple Computer, Inc."
  }
}
Bring your own schema
Divolte Collector uses Avro to write data to files. Avro records require you to define a Avro schema that defines the fields in the records. Divolte Collector comes with a built in generic schema that is useful for keeping track of the basics of your click stream data, but in most cases it makes sense to create your own schema with more specific fields that have a meaning within your website’s domain. In order to achieve this, two things are needed: 1) A custom Avro schema and 2) a mapping, that defines how to map requests onto the custom schema. Let’s create a custom schema.
Create a file called MyEventRecord.avsc with the following contents (for example in the conf/ directory under the Divolte Collector installation):
{
  "namespace": "io.divolte.examples.record",
  "type": "record",
  "name": "MyEventRecord",
  "fields": [
    { "name": "timestamp",               "type": "long"},
    { "name": "remoteHost",              "type": "string"},
    { "name": "location",                "type": ["null", "string"], "default": null},
    { "name": "localPath",               "type": ["null", "string"], "default": null},
    { "name": "q",                       "type": ["null", "string"], "default": null},
    { "name": "n",                       "type": ["null", "int"],    "default": null}
  ]
}
This is a very minimal custom schema, but it allows us to demonstrate a very important feature in Divolte Collector: mapping. In order to use the custom schema, we need to create a mapping that maps incoming requests onto the schema fields. Create a file called mapping.groovy with the following contents:
mapping {
  map timestamp() onto 'timestamp'
  map remoteHost() onto 'remoteHost'
  map location() onto 'location'

  def locationUri = parse location() to uri
  def localUri = parse locationUri.rawFragment() to uri
  map localUri.path() onto 'localPath'

  def localQuery = localUri.query()
  map localQuery.value('q') onto 'q'
  map { parse localQuery.value('n') to int32 } onto 'n'
}
The mapping is defined using a internal Groovy DSL in Divolte Collector. In this example we map a number of values onto fields in the Avro schema. The values for timestamp, remoteHost and location are mapped directly onto fields in the schema. In the remainder of the script, we tell Divolte Collector to take the fragment of the location (the part after the # in the URL) and try to parse that into a (partial) URI again. From the result URI, we map the path onto a schema field. Subsequently, parse out the values to two query string parameters (q and n) and map those onto separate schema fields after trying to parse an int out of the n parameter. The mapping DSL allows for a lot more constructs, including conditional logic, regex matching and more; see the Mapping documentation for more information on this.
Finally, we need to configure Divolte Collector to use our custom schema and mapping. Edit the (empty) divolte-collector.conf file in the conf/ directory of your installation to resemble the following configuration (be sure to use the correct paths for the schema and mapping file that you just created):
divolte {
  tracking {
    schema_file = "/path/to/divolte-collector/conf/MyEventRecord.avsc"
    schema_mapping {
      version = 2
      mapping_script_file = "/path/to/divolte-collector/conf/mapping.groovy"
    }
  }
}
Note: Divolte Collector configuration uses the Typesafe Config library, which uses a configuration dialect called HOCON.
Now, once more, start Divolte Collector as before. Only this time, take you web browser to this address: http://127.0.0.1:8290/#/fragment/path?q=textual&n=42. You can refresh the page a couple of times and perhaps change the query string parameter values that are in the URL to something else. After you have done one or more requests, stop Divolte Collector again (using CTRL+C) and look at the collected data using this command again:
find /tmp/*.avro -name '*divolte-tracking-*.avro' | sort | tail -n1 | xargs bin/avro-tools tojson --pretty
Now, the records in the data should look like this:
{
  "timestamp" : 1418942046953,
  "remoteHost" : "127.0.0.1",
  "location" : {
    "string" : "http://127.0.0.1:8290/#/fragment/path?q=textual&n=42"
  },
  "localPath" : {
    "string" : "/fragment/path"
  },
  "q" : {
    "string" : "textual"
  },
  "n" : {
    "int" : 42
  }
}
As you can see, the data collected by Divolte Collector is based on the custom schema and mapping. This is in fact a very powerful concept, because it means that the data that is being collected, can be enriched on the fly with domain specific fields that are extracted from the click stream. This way, you shouldn’t require to parse out relevant bit and pieces of information afterwards. Also note that we were able to collect the entire location from the browser on the server side, including the part after the #. This comes in very handy when working with modern JavaScript based web applications that often depend on this part of the location for their state.
Collecting clicks for your own site
Underpinning the click event data collection, is a small piece of JavaScript, which is called a tag. The tag needs to be inserted into every web page that you want to track. Usually, this is done by adding the tag to a template or footer file in your website. This depends largely on how your web pages are created / generated and organised. Here is an example of the Divolte Collector tag in a HTML page.
<html>
  <head>
    <title>My Website with Divolte Collector</title>
  </head>
  <body>
    <!--
      body content
    -->

    <script src="//localhost:8290/divolte.js" defer async></script>
  </body>
</html>
So, the tag is only this one line:
<script src="//localhost:8290/divolte.js" defer async></script>
Nevertheless, the tag performs a number of important tasks. It generates unique identifiers for parties, sessions, pageviews and events. It collects the location, referer, screen and vieport size information from the browser. And then, it takes all this information and sends it to the Divolte Collector server, by creating a HTML img element with all information added as query string parameters to the image’s URL. Using an img for this purpose is common practice amongst click event logging solutions and will give the best results (in spite of the availability of perhaps more advanced mechanisms, such as XHR requests).
In order to instrument a web page of your own, just add the tag as above into the HTML code on each page. Additionally, once the Divolte Collector JavaScript is loaded in the browser, it is possible to fire custom events from JavaScript in the page:
// The first argument is the event type; the second argument is
// a JavaScript object containing arbitrary event parameters,
// which may be omitted
divolte.signal('myCustomEvent', { param: 'foo',  otherParam: 'bar' })
In order to use the custom events in your mapping, map values onto fields like this:
// Map the custom event type
map eventType() onto 'eventTypeField'

// Map the custom event parameters
map eventParameter('param') onto 'paramField'
map eventParameter('otherParam') onto 'otherParamField'

/*
 * Note that custom event parameters are always interpreted
 * as string on the server side for safety. If you are sure
 * a certain param is always of a certain type, you need to
 * explicitly cast it in the mapping, as below.
 *
 * For more information on types and parsing, see the mapping
 * documentation
 */
map { parse eventParameter('foo') to int32 } onto 'intField'
Writing to HDFS
So far, we’ve been writing our data to the local filesystem in /tmp. Although this works, this is not the intended use of Divolte Collector. The aim is to write the clickstream data to HDFS, such that it is safely and redundantly stored and, above all, is available for processing using any tool available that knows how to process Avro files (e.g. Apache Hive or Apache Spark). It is trivial to configure Divolte Collector to write to HDFS. Of course you will need to have a working HDFS instance setup, but setting this up is out of the scope of this getting started guide. There are many great resources to be found on the internet about getting started with and running Hadoop and HDFS.
Assuming you have a HDFS instance running somewhere, there are two ways of making Divolte Collector write files to it: 1) by direct configuration or 2) by setting the HADOOP_CONF_DIR environment variable to point to a directory containing valid Hadoop configuration files. While the first option works, it is recommended to use the latter, as this is easier to maintain when your HDFS parameters change over time.
First, we’ll change the configuration to write files to HDFS. Add the following section to conf/divolte-collector.conf:
divolte {
  hdfs_flusher {
    // Enable the HDFS flushing
    enabled = true

    // Use multiple threads to write to HDFS
    threads = 2

     // Use a simple strategy of rolling files after a certain period of time.
     // For other strategies, have a look at the configuration documentation.
    simple_rolling_file_strategy {
      // Create a new file every hour
      roll_every = 1 hour

      // Perform a hsync call on the HDFS files after every 1000 record written or
      // after every 5 seconds, whichever happens first.

      // Performing a hsync call periodically prevents data loss incase of failure
      // scenarios.
      sync_file_after_records = 1000
      sync_file_after_duration = 5 seconds

      // Files that are being written will be created in a working directory.
      // Once a file is closed, Divolte Collector will move the file to a
      // publish directory. The working and publish directories are allowed
      // to be the same, but this is not recommended.
      working_dir = "/divolte/inflight"
      publish_dir = "/divolte/published"
    }
  }
}
Note that you need to create these directories on HDFS prior to starting Divolte Collector. It will not startup if the directories do not exist.
If you have a working HDFS setup and a directory with the appropriate configuration files, Divolte Collector will use them automatically if a HADOOP_CONF_DIR environment variable is set pointing to that directory. Otherwise, it is possible to tell Divolte Collector directly about your HDFS location from the configuration:
divolte {
  hdfs_flusher {
    hdfs {
      uri = "hdfs://192.168.100.128:8020/"
      replication = 1
    }
  }
}
Do note that in this scenario, it is not possible to set additional HDFS client configuration, as you can do when using the HADOOP_CONF_DIR environment variable. Also, when your HDFS NameNode is setup redundantly, you could configure only one using the Divolte Collector configuration. This is why it is recommended to use a HADOOP_CONF_DIR.
With everything in place, start Divolte Collector again, create some events and see verify that files are being created on HDFS:
[root@hadoophost ~]# hadoop fs -ls /divolte/inflight/
Found 2 items
-rw-r--r--   1 divolte supergroup        617 2014-08-30 11:46 /divolte/inflight/20141220152512-divolte-tracking-divoltehost-1.avro.partial
-rw-r--r--   1 divolte supergroup        617 2014-08-30 11:46 /divolte/inflight/20141220152513-divolte-tracking-divoltehost-2.avro.partial
After the rolling interval, files should show up in the publish directory with a .avro extension (without the .partial). However, if a file was opened in the working directory, but no events were ever written to it (because there was no activity or otherwise), it will not be moved to the publish directory, but will be deleted entirely instead:
[root@hadoophost ~]# hadoop fs -ls /divolte/published/
Found 1 items
-rw-r--r--   1 divolte supergroup       2321 2014-08-30 11:48 /divolte/published/20141220152513-divolte-tracking-divoltehost-2.avro
Writing to Kafka
Configuring Divolte Collector to write data to a Kafka topic is quite similar to the HDFS configuration:
divolte {
  kafka_flusher {
    // Enable Kafka flushing
    enabled = true

    // This is the name of the topic that data will be produced on
    topic = divolte-data

    // The properties under the producer key in this
    // configuration are used to create a Properties object
    // which is passed to Kafka as is. At the very least,
    // configure the broker list here. For more options
    // that can be passed to a Kafka producer, see this link:
    // http://kafka.apache.org/documentation.html#producerconfigs
    producer = {
      metadata.broker.list = "10.200.8.55:9092,10.200.8.53:9092,10.200.8.54:9092"
    }
  }
}
Data in Kafka
Avro files on HDFS are written with the schema in the header. Unfortunately, Kafka doesn’t really have a clear way of passing along the schema. So, instead, for the messages on Kafka queues, we expect the consumer to know the schema in advance, meaing that the messages that are passed onto the queue only contain the raw bytes of the serialized Avro record without any metadata. The key of each message is the party ID that belongs to the request. Divolte Collector provides a small helper library to easily create Kafka consumers in Java using Avro’s code generation support. There is an example Kafka consumer with step by step instruction on getting it up and running in our usgae examples repository here: https://github.com/divolte/divolte-examples/tree/master/tcp-kafka-consumer.
What’s next
- Once you are collecting data to either HDFS or Kafka, see our examples to learn how to use your clickstream data in tools like Apache Spark, Apache Hive or Impala or build near real-time consumers for Apache Kafka with your Divolte Collector data.
- Learn more about custom schema’s and mapping in the Mapping documentation.
- Planning a production deployment? See the Deployment guide.
- Want to know how Divolte Collector works internally? See the Architecture and internals documentation.
- Review all the configuration options in the Configuration documentation.